
Enter the Matrix
Posted by Dan Byström on October 14, 2004
Last week, I ran into the GDI+ ColorMatrix for the first time ever. I was amazed, because it was a totally obvious way to handle a common task and yet I had never seen it or thought of it before!
A ColorMatrix is in perfect analogy with a regular transformation matrix. For those unfortunate of you who have never encountered a transformation matrix before I’ll recapitulate the fundamentals – just for fun. If you don’t know how to do matrix multiplication you need to
get familiar with that first.
| Life is good for only two things, discovering mathematics and teaching mathematics. — Siméon Poisson |
If we restrict ourselves to two dimensions, we can express a point with its rectangular coordinates x and y, respectively, like this: ( x , y ).
A transformation matrix is a matrix you multiply with the coordinate vector to move it to another place. A rotation matrix, for example, looks like this:
/ cos α -sin α \ \ sin α cos α /
Multiplying it with ( x , y ) gives the new position:
(x·cos α + y·sin α , x·sin α – y·cos α )
Apart from rotation, we can also get scaling matrixes as well as sheering matrixes. But we cannot get translation (moving along the coordinate axes a fixed distance) in this way. To get that, we need to augment our representation of both the coordinate vector and the matrix like this:
( x , y , 1 ) and
/ m00 m01 0 \ | m10 m11 0 | \ 0 0 1 /
This is called homogenous notation and in the form above it doesn’t affect the previous form in any way. Nor does it contribute in any way. But if we make use of the third row, we will be able to do translatation too:
/ 1 0 0 \ | 0 1 0 | \ Tx Ty 1 /
Multiplying the above matrix with (x , y , 1) gives the new position ( x + Tx, y + Ty , 1 ). Great.
If you want to apply a rotation around a different point than origo, then you have to first translate your coordinate by that point, rotate and then translate back. Three consecutive matrix multiplications? No – now comes the cool part. You can create a new transformation matrix first, which includes all three steps! A great way to optimize your code!
The above is a description of the transformation matrixes used in GDI+ (found in the System.Drawing.Drawing2D namespace). Since we never use the third column (it will always be
( 0 , 0 , 1 )T), GDI+ has simply thrown it away. While I’m still at it; GDI+ provides a Matrix.RotateAt method for us lazy programmers, which will immediately create the “translate, rotate and translate back” matrix for us in one step.
When we move up to three dimensions, we will also be able to work with projection matrixes, which will help us to project our three dimensional world onto a two dimensional plane (=the screen). But now we have moved away from GDI+ and entered DirectX. Enough said about transformation matrixes.
Now a ColorMatrix does the very same thing… to colors!!! It will help us transform a color into a new color. By passing a ColorMatrix to the Graphics.DrawImage method, you can apply your color transformation to every single pixel in an image while painting. A color (or you may read pixel) is expressed like (R , G , B, A , 1) for its red, green, blue and alpha components and then finally the 1 for the homogenous notation (although we never will notice it in practice).
By multiplying a single color (pixel) with this ColorMatrix:
/ 1 0 0 0 0 \ | 0 1 0 0 0 | | 0 0 1 0 0 | | 0 0 0 1/2 0 | \ 0 0 0 0 1 /
What will we get? Obviously we get (R , G , B , A/2 , 1). We have, in other words, halved the color’s/pixel’s alpha component and therefore gotten a semi-transparent image! Way cool! Trying out something weird::
/ 0 1 0 0 0 \ | 1 0 0 0 0 | | 0 0 0 0 0 | | 0 0 0 1 0 | \ 0 0 1 0 1 /
This will give (G , R , 1 , A , 0 ), which means that we have swapped the red and green components around in our new image as well as tinted it heavily blue (maximum blue component), distorting it considerably.
This may be a little more useful (and is something I use in an application I’m currently writing):
/ 1.2 0 0 0 0 \ | 0 1.2 0 0 0 | | 0 0 0.5 0 0 | | 0 0 0 1 0 | \ 0.05 0.05 0 0 1 /
This yields ( 1.2(R+0.05) , 1.2(G+0.05) , 0.5B , A , 1 ). It enhances red and green and suppresses blue (leaving the alpha component intact). In other words, it gives the image a yellow tint, which I use on a picture of wood in order to distinguish wet wood from dry wood in the user interface.
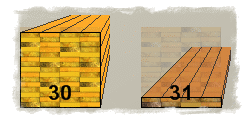 |
The image to the left has been created from the right image (the short side of the packet, which are only partly visible on the right packet here) by using the above color matrix. We also see a “ghosted” image (with alpha 0.25) showing the size of a full packet. |
In this MSDN article, we learn that .NET doesn’t provide a way to create a gray scale image. The author therefore writes a method doing this on a pixel per pixel basis and also demonstrating the use of pointers in unmanaged C#. It’s a good article, and I even thought of rewriting it into hand optimized assembler to show what a boost you can get from that. However, the claim that .NET doesn’t provide a way to create a gray scale image is completely wrong! How do you do it? With a ColorMatrix of course!
A grey color is a color where the red, green and blue components are equal. In order to produce a gray scale we simply have to calculate the brightness for each color. Taking the average of the red, green and blue component will do the trick:
/ 1/3 1/3 1/3 0 0 \ | 1/3 1/3 1/3 0 0 | | 1/3 1/3 1/3 0 0 | | 0 0 0 1 0 | \ 0 0 0 0 1 /
People who know more about color vision that I do may claim what this is wrong because the eye is more sensitive to green than blue (maybe) and that the factor 1/3 shouldn’t be applied to all components (although PaintShop Pro appears to use exactly these values BTW). Maybe (0.35 0.4 0.25) is more accurate… or other factors… but that’s not the point. The ColorMatrix will do
the transformation for you once you know the exact factors. (If this calculation is taking place in the graphics card while painting, we cannot beat the performance how hard we try, otherwise a specialized grayscale method will be able to execute slightly faster.)
Finally, a little experiment. I myself belong to the 5% – 20% (according to whose number you should believe) of the male population who are color blind. Most people I talk to have no idea what is meant by that, believing that all I see is black and white or have even funnier guesses.
There are different kinds of color blindness. The most common one is caused by a misalignment of the green and red receptors in the eye. Blue defectiveness is uncommon.
By applying this color matrix to an image:
/ 1 – z z 0 0 0 \ | z 1-z 0 0 0 | | 0 0 1 0 0 | | 0 0 0 1 0 | \ 0 0 0 0 1 /
You should be able to get a feeling for what is happening when you “can’t see red or green clearly”. By giving z a value of zero, we get the identity matrix and therefore a completely undistorted image. By varying z in the ]0 , 0.5] range you create a weighted average of the red and green component (smoothing out the distinction between them), which should in some way mimic what’s happening when the eye cannot distinguish clearly between red and green. A value of 0.5 will in effect make a “gray scale of red and green, leaving blue unaffected”. Eh, that
sounded weird. Values in the ]0.5 , 1] range will start to swap the meaning of red and green. A funny observation: a z of 1 means that red and green are completely swapped, but that no information is lost. Theoretically a person with such a decfect color sight would have perfect color vision and simply learn that the word for what he sees as green is red and vice versa.
The image to the right has been created by applying the above color matrix to the left image, using a z value of 0.3, simulating a defect red-green vision.


As I said, this is a little experiment and I may really be totally out of line here. If you’re interested, there are numerous web pages dedicated to this concept.
Can Color-Blind Users See Your Site? is a good MSDN article discussing UI design also and gives a few pointers to other sources. I’ve come across applications which I haven’t been able to use without pasting screen shots into Paint Shop Pro and investigate the “bad” colors using the color dropper.
Time to leave the Matrix.

Soft edged images in GDI+ « Dan Byström’s Weblog said
[…] can use a ColorMatrix to draw a semi-transparent image. However, I can’t figure out a way to use this technique to […]