Dan Byström’s Bwain

Blog without an interesting name

.Net structs

Posted by Dan Byström on November 28, 2016

Recently, I followed a link in a tweet by Alexandre Mutel (creator of SharpDx, etc)

To my surprise, in that blog post was a link to a StackOverflow question, written by myself, one and a half year ago or so.

That got me remembering why I asked that question – experimenting with serialization and deserialization of struct-arrays – and then the fact that I have several times encountered expert programmers with cargo cult ideas of the behavior of structs in .Net. It is not uncommon to hear statements “structs are always allocated on the stack”, “structs are slower than classes” and “a struct should not be larger than X bytes” (where X varies widely).

No matter what is true for structs – putting them in an array is often a game changer, and sometimes that is the best approach for a given problem. But as always: it depends. Although all this is old and trivial things, I thought that I’d some day write something on this topic. That happened to be today.

Try to compile the following code, one time with Demo declared as a struct and one time as a class:

public [struct or class] Demo
{
  public double A;
  public double B;

  public static Demo[] AllocateArray(int size)
{
    var arr = new Demo[size];
    for (var i = 0; i < arr.Length; i++)
      arr[i] = new Demo {A = i + 1, B = i + 2};
    return arr;
  }

  public static void PlayAround(Demo[] arr)
  {
    for (var i = 1; i < arr.Length; i++)
      arr[i - 1].A = arr[i].A + arr[i].B;
  }

}

Let’s see what happens when we allocate the array (both as x86 and x64) and check the memory consumption, after passing a size of 1,000,000 items:

Memory (Mb)
Class
– x86 26.7
– x64 38.2
Struct
– x86 15.3
– x64 15.3

So, what’s going on? Take a look at the picture below.

class_struct

Each oval represents an object that can be referenced and garbage collected individually. In the first case, with classes, we allocate 1,000,001 individual objects. In the second case, with structs, we just allocate one big object in memory where all the structs resides in consecutive memory.

Each object has an overhead of 8 or 16 bytes (x86 or x64) bytes (this is partially true), and a reference to an object takes 4 or 8 bytes (x86 or x64). So a reference + object overhead is 12 or 24 bytes (x86 or x64). The two doubles A and B takes 16 bytes together in both x86 and x64.

Theoretic calculations then gives (the object overhead of the array itself I omitted since it is just silly in comparison to the other numbers):

Formula Memory (Mb)
Class
– x86 10000000*(12+16) 26.7
– x64 10000000*(24+16) 38.1
Struct
– x86 10000000*16 15.3
– x64 10000000*16 15.3

Whoa! Theory and practice correlates! 🙂

Now let’s play around with the allocated array a few iterations (by calling the PlayAround method):

Time (ms)
Class
– x86 258
– x64 313
Struct
– x86 117
– x64 128

Now let’s try to make the Demo struct/class significantly bigger by adding a few more doubles to it, bringing it up to a total of 128 bytes, by making the declaration look like this:

  public double A;
  public double B;
  public double pad1;
  public double pad2;
  public double pad3;
  public double pad4;
  public double pad5;
  public double pad6;
  public double pad7;
  public double pad8;
  public double pad9;
  public double pad10;
  public double pad11;
  public double pad12;
  public double pad13;
  public double pad14;
Time (ms)
Class
– x86 1018
– x64 904
Struct
– x86 625
– x64 649

As you can see, in this particular case, the rule of the thumb that a struct should not be larger than X bytes, is not applicable (there is an MSDN article claiming that it should not be more than 16 bytes, for example).

As side note when it comes to passing around large structs, you have always the choice of passing them around as ref, even if you do not mean to modify them, although that may confuse a reader of your code. In this case they won’t be copied onto the stack, but passed by reference in a similar way as normal class objects are passed by default.

So, to conclude, when putting structs into an array, you get a behavior that may contradict what is commonly claimed about structs.

Chose the best tool for your current problem and always benchmark instead of guessing.

Thanks for reading, and please remember that fast code consumes less energy.

PS. What I experimented with a while ago was serializing struct arrays directly to disk with no intervening code at all. It turned out that with a local SSD disk drive this method would beat the crap out of any serialized I tested. But when serializing over a network, compressing data like, for example. Protobuf.Net does, gave better performance.

DS. Thanks to Peter af Geijerstam and Per Rovegård for corrections.

Posted in Programming | Leave a Comment »

Matchmaking

Posted by Dan Byström on December 29, 2013

This post contains a synopsis of an algorithm I used to cut down execution time of the following code:

foreach (var mline in mlines)
  foreach (var xline in xlines)
    if (xline.AIds.Contains(mline.AId) && xline.BIds.Contains(mline.BId) && xline.CIds.Contains(mline.CId))
    {
      // do something useful...
      matchCount++;
    }

Given that there are 100,000 “xlines” and an average of 4 items in the AIds/BIds/CIds arrays – the execution time drops from 2 hours and 54 minutes down to 47 seconds when matching 1,000,000 “mlines”.

Since I was about to write this down anyway and it contains an unusual data structure – dictionaries of hash sets – I thought that I could just as well publish it.

Given problem: match something called “m-lines”:

# A-Id B-Id C-Id Relevant data…
0 34 56 45
1 12 39 776
2 19 56 92
3 576 243 646


with something called “x-lines”:

# A-Ids B-Ids C-Ids Relevant data… Match with m-lines
0 12,34,59 18,39,56,89 45,78 0
1 12,19,59,117 39,56,243 78,646
2 19,34,35,576 18,56,89 45,92,776 0,2
3 34,35,117,576 56,243 45,78,646,776 0,3


The rule for a match is simple: an m-line matches an x-line if the A-Id of the m-line is present in the A-Ids of the x-line and the same for the B-Id in the B-Idsand the C-Id in the C-Ids.

This is pretty straightforward and as long as we have just a few hundred lines this will be just fine. But as the number of lines increases, this will become painfully slow. On may laptop, 1,000,000 m-lines combined with 100,000 c-lines takes almost 3 hours. And this is supposed to happen in a user interaction!

The solution I came up with is to first pre-processes  the c-lines and produces the following lookups:

A Dictionary B Dictionary C Dictionary
key int value HashSet<int> key int value HashSet<int> key int value HashSet<int>
12 0,1 18 0,1 45 0,2,3
19 1,2 39 0,1 78 0,1,3
34 0,2,3 56 0,1,2,3 92 2
35 2,3 89 0,2 646 1,3
59 0,1 243 1,3 776 2,3
117 1,3
576 2,3


The simple idea is that this gives all the indexes of x-lines containing a certain Id, for the A’s, B’s and C’s respectively. All the x-lines that matches a certain m-line is is then simply the intersection of these three hash sets. And this is a fast operation.

foreach (var mline in mlines)
{
  HashSet h1, h2, h3;
  if (!alookup.TryGetValue(mline.AId, out h1))
    continue;
  if (!blookup.TryGetValue(mline.BId, out h2))
    continue;
  if (!clookup.TryGetValue(mline.CId, out h3))
    continue;
  putSmallestHashSetFirst(ref h1, ref h2, ref h3);
  foreach (var idx in h1.Where(_ => h2.Contains(_) && h3.Contains(_)))
  {
    var xline = xlines[idx];
    //do something useful...
    matchCount--;
  }
}

So there it is: a nice speed up of a factor 222!

It is not only the users waiting time we have saved here – we have also saved a lot of electricity by cutting down the computing time. Fast algorithms should indeed be classified as eco-friendly! 🙂

Therefore, I propose the following New Year’s resolutions for 2014:

  • try to eat less meat
  • try to travel by public transportation whenever possible
  • try to write more efficient algorithms

And then we have helped a little tiny bit to save the environment! Happy New Year!

Posted in Programming | Leave a Comment »

factor10 is the future

Posted by Dan Byström on December 23, 2010

After running my own company, Visual Design Softscape AB, for over 15 years, I’ve decided that it’s about time to take a step forward.

As of 1st January 2011, I’ll be joining the guys at factor10 full-time.

I really look forward to have inspiring colleagues to help improve my work – and hopefully that will work both ways. 🙂

Posted in Uncategorized | 2 Comments »

Thumbnails with glass table reflection in GDI+

Posted by Dan Byström on January 12, 2009

vistathumbnailsI’ve been playing around with image processing lately and since my last post about loading thumbnail images from files I couldn’t help myself from trying to roll my own “Web 2.0 reflection effect” directly in .NET 2.0 with no 3D support whatsoever. Actually, I think was more inspired by Windows Vista’s thumbnails (to the right) than the web.

This is what I eventually came up with:

reflectionsamples1

Although this is all easy – since there were a few things that couldn’t be done in “pure” GDI+ and then some uncommon approaches involved in my solution, I think that there may be some people out there who don’t find this totally trivial. So I thought that it might be worth writing this down.

From the original picture I work through four steps:

reflectionsteps2

1. The first step merely shrinks the original picture to the desired size and puts a frame around it. This is trivial:

	protected virtual Bitmap createFramedBitmap( Bitmap bmpSource, Size szFull )
	{
		Bitmap bmp = new Bitmap( szFull.Width, szFull.Height );
		using ( Graphics g = Graphics.FromImage( bmp ) )
		{
			g.FillRectangle( FrameBrush, 0, 0, szFull.Width, szFull.Height );
			g.DrawRectangle( BorderPen, 0, 0, szFull.Width - 1, szFull.Height - 1 );
			g.InterpolationMode = System.Drawing.Drawing2D.InterpolationMode.HighQualityBicubic;
			g.DrawImage(
				bmpSource,
				new Rectangle( FrameWidth, FrameWidth, szFull.Width - FrameWidth * 2, szFull.Height - FrameWidth * 2 ),
				new Rectangle( Point.Empty, bmpSource.Size ),
				GraphicsUnit.Pixel );
		}
		return bmp;
	}

(Note the InterpolationMode property. It is important in order to resize the image with good quality!)

2. The second step is substantially more involved. It takes the result from step 1 and does this, all in one go:

  1. Flip the image upside down (omitting the upper and lower parts of frame, since we don’t want them to be present in the reflection).
  2. Apply a Gaussian blur convolution effect to make the image look…, well, blurred… 🙂
  3. Wash out some color to make the reflection a little bit grayish.
  4. Apply an alpha blend fall out.

Flipping the image and the color wash-out can both be done directly in GDI+. Flip either with Bitmap.RotateFlip or with a transformation matrix and use a ColorMatrix to alter the colors. But since neither a blur effect nor an alpha blend can be done without direct pixel manipulation I did it all in one go. For the blur effect, see Christian Graus excellent article series Image Processing for Dummies with C# and GDI+. I’ve blogged earlier on how to perform alpha blending previously by drawing the blend using a PathGradientBrush or a LinearGradientBrush in Soft edged images in GDI+. This time I will calculate the alpha value instead. The calculation is done once for every scan line and is located in a virtual function so that this formula can be overridden.

All four “effects” are handled in this loop:

	for ( int y = height-1 ; y >= 0 ; y-- )
	{
		byte alpha = (byte)(255 * calculateAlphaFallout( (double)(height - y) / height ));
		Pixel* pS = (Pixel*)bdS.Scan0.ToPointer() + bdS.Width * (bdS.Height - y - FrameWidth - 1);
		Pixel* pD = (Pixel*)bdD.Scan0.ToPointer() + bdD.Width * y;
		for ( int x = bdD.Width ; x > 0 ; x--, pD++, pS++ )
		{
			int R = gaussBlur( &pS->R, nWidthInPixels );
			int G = gaussBlur( &pS->G, nWidthInPixels );
			int B = gaussBlur( &pS->B, nWidthInPixels );
			pD->R = (byte)((R * 3 + G * 2 + B * 2) / 7);
			pD->G = (byte)((R * 2 + G * 3 + B * 2) / 7);
			pD->B = (byte)((R * 2 + G * 2 + B * 3) / 7);
			pD->A = alpha;
		}
	}

Flipping happens on line 4, blurring on lines 8-10 (the gaussBlur function is just a one-liner). Color wash-out is done on lines 11-13 and the alpha fall-out on lines 3 and 14.

The very observant reader will notice that I let the blurring wrap from one edge to another. This is a hack, but it works since the left and right edges are always exactly identical. In production code, it might be a good idea to make the blurring optional (or even to provide a user-defined convolution matrix) and also to do the same from the color wash-out which currently uses hard-coded values.

3. Create the “half sheared” bitmap:

This transform cannot be accomplished using a linear transformation, but (after taking quite a a detour on this) I realized that it can be done embarrassingly simple:

	using ( Graphics g = Graphics.FromImage( Thumbnail ) )
		for ( int x = 0 ; x < sz.Width ; x++ )
			g.DrawImage(
				bmpFramed,
				new RectangleF( x, 0, 1, sz.Height - Skew * (float)(sz.Width - x) / sz.Width ),
				new RectangleF( x, 0, 1, sz.Height ),
				GraphicsUnit.Pixel );
&#91;/sourcecode&#93;

I simply use DrawImage to draw each column by its own, transferring one column from the framed image from step 1 to a column of different height. Note that it is extremely important that we pass <strong>float</strong>s and not <strong>int</strong>s - in the latter case the result will be a disaster.

<span style="font-size:x-large;">4.</span> Draw the reflection image through a shear transform, like this:


	using ( Graphics g = Graphics.FromImage( Thumbnail ) )
	{
		System.Drawing.Drawing2D.Matrix m = g.Transform;
		m.Shear( 0, (float)Skew / sz.Width);
		m.Translate( 0, sz.Height - Skew - 1 );
		g.Transform = m;
		g.DrawImage( bmpReflection, Point.Empty );
	}
 

Download demo source code

A Lesson Learned

At first, I tried to do the shearing in both step 3 & 4 myself using code similar to this (still one column at a time):

	// this was a bad idea
	private static void paintRowWithResize(
		BitmapData bdDst,
		BitmapData bdSrc,
		int nDstColumn,
		int nSrcColumn,
		int nDstRow,
		double dblSrcRow,
		int nRows,
		double dblStep )
	{
		unchecked
		{
			unsafe
			{
				Pixel* pD = (Pixel*)bdDst.Scan0.ToPointer() + nDstColumn + nDstRow * bdDst.Width;
				Pixel* pS = (Pixel*)bdSrc.Scan0.ToPointer() + nSrcColumn;
				while ( nRows -- > 0 )
				{
					int nYSrc = (int)dblSrcRow;
					Pixel p1 = pS[nYSrc * bdSrc.Width];
					Pixel p2 = p2 = pS[(nYSrc + 1) * bdSrc.Width];
					double frac2 = dblSrcRow - nYSrc;
					double frac1 = 1.0 - frac2;
					pD->R = (byte)(p1.R * frac1 + p2.R * frac2);
					pD->G = (byte)(p1.G * frac1 + p2.G * frac2);
					pD->B = (byte)(p1.B * frac1 + p2.B * frac2);
					pD->A = (byte)(p1.A * frac1 + p2.A * frac2);

					dblSrcRow += dblStep;
					pD += bdDst.Width;
				}
			}
		}
	}

The result looked perfectly good, but after thinking about it for awhile I realized that this piece of code actually is completely and utterly wrong in the general case: it only works when the alpha values of the two adjacent pixels are very close. In other cases the result will be poor.

Perhaps the easiest way to see this is to think about what happens when we want a 50% mix of a completely transparent pixel and a completely opaque while pixel. Intuitively I think it’s clear that we want the result to be a white pixel with 50% transparency. However, if we represent the transparent pixel with (0,0,0,0) (the most common value I’d guess, although (0,x,x,x) is transparent regardless of the value of x) we get a gray half transparent pixel instead (127,127,127,127). Not right at all. The reason I thought my attempt looked good in the first place was just because I had a gray border around the images!

So how do we mix pixels with alpha values? Obviously “normal” alpha blending is not sufficient when we have alpha values on both pixels… after thinking about this for a few minutes,  I said to myself “why not ask someone who knows instead?”. That someone is of course Graphics.DrawImage, and so I ended up with much cleaner code. And although I never bothered to figure out how to mix and blend pixels when both pixels contain alpha values I ended up realizing this:

Graphics.DrawImage has quite a bit of work to do when we draw a 32-bit bitmap on top of another. If we have some a-priori knowledge of the nature of the bitmaps we’re working with (are any of them totally opaque?) then it is actually possible to do this ourselves much faster than Graphics.DrawImage has a chance to, because it is forced to work with the general case: both bitmaps may be semi-transparent.

I will get back on how we in some cases can outperform Graphics.DrawImage (when it comes to speed), and hopefully a real life case when we actually bother. Stay tuned. Ekeforshus

Posted in .NET, GDI+, Programming | 12 Comments »

Image.GetThumbnailImage and beyond

Posted by Dan Byström on January 5, 2009

Once I tried to use Image.GetThumbnailImage because I wanted to fire up small thumbnails as fast as possible. So I tried:

	// totally and completely, utterly useless
	private Bitmap getThumbnailImage( string filename, int width, int height )
	{
		using ( Image img = Image.FromFile( filename ) )
			return (Bitmap)img.GetThumbnailImage( width, height, null, IntPtr.Zero );
	}

This turned out to be completely useless, since Image.FromFile first loads the full image so that no performance is gained whatsoever. Trying to google after a solution only resulted in tons of articles saying that Image.GetThumbnailImage is pretty useless and shouldn’t be used. So I dropped it and solved my problem in a completely different way. Now I just stumbled across an overloaded version Image.FromStream which I haven’t noticed before:

Image.FromStream( Stream stream, bool useEmbeddedColorManagement, bool validateImageData )

This opens up for some interesting usages. For example it means that we really can get a thumbnail fast:

	// way, way faster, but still pretty useless
	private Bitmap getThumbnailImage( string filename, int width, int height )
	{
		using ( FileStream fs = new FileStream( filename, FileMode.Open ) )
		using ( Image img = Image.FromStream( fs, true, false ) )
			return (Bitmap)img.GetThumbnailImage( width, height, null, IntPtr.Zero );
	}

This is still pretty useless, since this way we really don’t know how to get a proportional thumbnail. This is something that seems to be lacking in GDI+: an easy way to rescale images proportionally. Quite frankly: how often are we interested in non-proportional rescales? Not that often, I’d say! Here’s a better version:

	// actually works...
	private Bitmap getThumbnailImage( string filename, int width )
	{
		using ( FileStream fs = new FileStream( filename, FileMode.Open ) )
		using ( Image img = Image.FromStream( fs, true, false ) )
			return (Bitmap)img.GetThumbnailImage(
				width,
				width * img.Height / img.Width,
				null,
				IntPtr.Zero );
	}

But if we arm ourselves with a way to rescale images proportionally, something Microsoft apparently decided to leave as an exercise for each and every programmer who wants to do even the simplest things with images in GDI+:

	public static Size adaptProportionalSize(
		Size szMax,
		Size szReal )
	{
		int nWidth;
		int nHeight;
		double sMaxRatio;
		double sRealRatio;

		if ( szMax.Width < 1 || szMax.Height < 1 || szReal.Width < 1 || szReal.Height < 1 )
			return Size.Empty;

		sMaxRatio = (double)szMax.Width / (double)szMax.Height;
		sRealRatio = (double)szReal.Width / (double)szReal.Height;

		if ( sMaxRatio < sRealRatio )
		{
			nWidth = Math.Min( szMax.Width, szReal.Width );
			nHeight = (int)Math.Round( nWidth / sRealRatio );
		}
		else
		{
			nHeight = Math.Min( szMax.Height, szReal.Height );
			nWidth = (int)Math.Round( nHeight * sRealRatio );
		}

		return new Size( nWidth, nHeight );
	}
&#91;/sourcecode&#93;

With that, we can fire up a thumbnail image fast, with a given maximum allowed size while still proportional:

&#91;sourcecode language='csharp'&#93;
	// even better...
	private Bitmap getThumbnailImage( string filename, Size szMax )
	{
		using ( FileStream fs = new FileStream( filename, FileMode.Open ) )
		using ( Image img = Image.FromStream( fs, true, false ) )
		{
			Size sz = adaptProportionalSize( szMax, img.Size );
			return (Bitmap)img.GetThumbnailImage(
				sz.Width,
				sz.Height,
				null,
				IntPtr.Zero );
		}
	}
&#91;/sourcecode&#93;

So, it appears that <strong>Image.GetThumbnailImage</strong> had its use after all! But there's more we can do with this.

Even though we managed to load thumbnail images fast and proportionally, the quality isn't particularly good. That's seems to be the main concern among those who advocate not using Image.GetThumbnailImage at all. If a thumbnail is found in the image file it has already been resized once, and resizing a resized image once more certainly won't improve the quality, especially if a crappy resizing algorithm is being used. Let's see what we can do about this. If we're working with JPG images coming from a digital camera, we can most probably find the "real" thumbnail image like this:


	private Bitmap getExifThumbnail( string filename )
	{
		using ( FileStream fs = new FileStream( filename, FileMode.Open ) )
		using ( Image img = Image.FromStream( fs, true, false ) )
		{
			foreach ( PropertyItem pi in img.PropertyItems )
				if ( pi.Id == 20507 )
					return (Bitmap)Image.FromStream( new MemoryStream( pi.Value ) );
		}
		return null;
	}

If we can retrieve a thumbnail this way, it will be in its original size and so we can skip an implicit resize. If we want to rescale it anyway, we can do it in a high quality fashion. I don’t know if this is something everybody knows – I had worked with GDI+ for quite some time before I found it – but fact is that resizing an image like this give good performance but crappy result:

	// poor image quality
	Bitmap bmpResized = new Bitmap( bmpOriginal, newWidth, newHeight );

Instead, try the following:

	// superior image quality
	Bitmap bmpResized = new Bitmap( newWidth, newHeight );
	using ( Graphics g = Graphics.FromImage( bmpResized ) )
	{
		g.InterpolationMode = InterpolationMode.HighQualityBicubic;
		g.DrawImage(
			bmpOriginal,
			new Rectangle( Point.Empty, bmpResized.Size ),
			new Rectangle( Point.Empty, bmpOriginal.Size ),
			GraphicsUnit.Pixel );
	}

With these code pieces glued together I can now get a thumbnail from a JPG image both faster and with better quality than with my original Image.ImageFromThumbnail attempt!

UPDATE: This technique is used “live” in the demo source code accompanying this post: Thumbnails with glass table reflection in GDI+.

Finally, one more thing that I just come to think of while I was typing this. I have complained in earlier posts that Image.FromFile for some obscure reason keeps the file locked until disposed of. I just realized that there is an easy way around his:

	using ( FileStream fs = new FileStream( filename, FileMode.Open ) )
		bmp = (Bitmap)Image.FromStream( fs );

Behold – now the image is loaded and the file is NOT locked! 🙂 Ekeforshus

Posted in .NET, GDI+, Programming | 17 Comments »

Optimizing away II.3

Posted by Dan Byström on January 1, 2009

Oh, the pain, the pain and the embarrassment…

I just came to realize that although a “long” in C# is 64 bits, in C++ it is still 32 bits. In order to get a 64 bit value in MSVC++ you must type either “long long” or “__int64”. I didn’t know that. 😦

This means that although the assembler function I just presented correctly calculates a 64 bit value, it will be truncated to 32 bits because the surrounding C++ function is declared as a long.

This in turn means that for bitmaps larger than 138 x 138 pixels – the correct result cannot be guaranteed. (With 64 bit values, the bitmap can instead be 9724315 x 9724315 pixels in size before an overflow can occur.)

Unfortunately, although I had unit test to verify the correctness of the function, I only tested with small bitmaps.

I have uploaded a new version. Ekeforshus

Posted in .NET, Programming | 3 Comments »

Optimizing away II.2

Posted by Dan Byström on December 30, 2008

I was asked to upload the source and binary for my last post.

Posted in .NET, Programming | 2 Comments »

Optimizing away II

Posted by Dan Byström on December 22, 2008

Continued from Optimizing away. Ok, now I have worked up the courage.

Prepare yourself for a major disappointment. I really do not know how to tweak that C#-loop to run a nanosecond faster. But I can do the same calculation much faster. How? Just my old favorite party trick. It goes like this:

1. Add a new project to your solution

2. Chose Visual C++ / CLR / Class Library

3. Insert the following managed class:

	public ref class FastImageCompare
	{
	public:
		static double compare( void* p1, void* p2, int count )
		{
			return NativeCode::fastImageCompare( p1, p2, count );
		}
		static double compare( IntPtr p1, IntPtr p2, int count )
		{
			return NativeCode::fastImageCompare( p1.ToPointer(), p2.ToPointer(), count );
		}
	};

4. Insert the following function into an unmanaged class (which I happened to call NativeCode):

unsigned long long NativeCode::fastImageCompare( void* p1, void* p2, int count )
{
	int high32 = 0;

	_asm
	{
		push	ebx
		push	esi
		push	edi

		mov		esi, p1
		mov		edi, p2
		xor		eax, eax
again:
		dec		count
		js		done

		movzx	ebx, [esi]
		movzx	edx, [edi]
		sub		edx, ebx
		imul	edx, edx

		movzx	ebx, [esi+1]
		movzx	ecx, [edi+1]
		sub		ebx, ecx
		imul	ebx, ebx
		add		edx, ebx

		movzx	ebx, [esi+2]
		movzx	ecx, [edi+2]
		sub		ebx, ecx
		imul	ebx, ebx
		add		edx, ebx

		add		esi, 4
		add		edi, 4

		add		eax, edx
		jnc		again

		inc		high32
		jmp		again
done:
		mov		edx, high32

		pop		edi
		pop		esi
		pop		ebx
	}

}

Yeah. That’s it. Hand tuned assembly language within a .NET Assembly. UPDATE 2009-01-01: return type of the function changed from “unsigned long” to “unsigned long long”, see here.

I guess that’s almost cheating. And we will be locked inside the Intel platform. Most people won’t mind I guess, but other may have very strong feelings about it. If we really would like to exploit this kind of optimizations while still be portable (to Mono/Mac for example) one possibility would be to load the assembly with native code dynamically. If it fails we could fall back to an alternative version written in pure managed code.

(I know from experience that some people with lesser programming skills react to this with a “what? it must be a crappy compiler if you can write faster code by yourself”. Let me assure you that this is not the case. On the contrary: I’m amazed about the quality of the code emitted by the C# + .NET JIT compilers.)

Posted in .NET, Programming | 13 Comments »

Optimizing away

Posted by Dan Byström on December 16, 2008

Follow-up on Improving performance…  and Genetic Programming: Evolution of Mona Lisa.
I just tested that I can optimize this loop:

unchecked
{
    unsafe
    {
        fixed ( Pixel* psourcePixels = sourcePixels )
        {
            Pixel* p1 = (Pixel*)bd.Scan0.ToPointer();
            Pixel* p2 = psourcePixels;
            for ( int i = sourcePixels.Length ; i > 0 ; i--, p1++, p2++ )
            {
                int r = p1->R - p2->R;
                int g = p1->G - p2->G;
                int b = p1->B - p2->B;
                error += r * r + g * g + b * b;
            }
        }
    }
}

so that it runs even 60% faster. Don’t dare to tell you how, however.

EDIT: Continued here Ekeforshus

Posted in .NET, Programming | 4 Comments »

Improving performance…

Posted by Dan Byström on December 14, 2008

…of the fitness function in the EvoLisa project. In case you managed to miss it, EvoLisa is an already world famous project created by Roger Alsing earlier this week.

Continued from this post.

With just a few changes, we can actually make the original fitness function run 25 times faster. I’ll start by presenting the original code and then directly the improved version. After that I’ll discuss my reasoning behind each one of the changes.

Original code:

	public static class FitnessCalculator
	{
		public static double GetDrawingFitness( DnaDrawing newDrawing, Color[,] sourceColors )
		{
			double error = 0;

			using ( var b = new Bitmap( Tools.MaxWidth, Tools.MaxHeight, PixelFormat.Format24bppRgb ) )
			using ( Graphics g = Graphics.FromImage( b ) )
			{
				Renderer.Render(newDrawing, g, 1);

				BitmapData bmd1 = b.LockBits(
					new Rectangle( 0, 0, Tools.MaxWidth, Tools.MaxHeight ),
					ImageLockMode.ReadOnly,
					PixelFormat.Format24bppRgb );

				for ( int y = 0 ; y < Tools.MaxHeight ; y++ )
				{
					for ( int x = 0 ; x < Tools.MaxWidth ; x++ )
					{
						Color c1 = GetPixel( bmd1, x, y );
						Color c2 = sourceColors&#91;x, y&#93;;

						double pixelError = GetColorFitness( c1, c2 );
						error += pixelError;
					}
				}

				b.UnlockBits( bmd1 );
			}

			return error;
		}

		private static unsafe Color GetPixel( BitmapData bmd, int x, int y )
		{
			byte* p = (byte*)bmd.Scan0 + y * bmd.Stride + 3 * x;
			return Color.FromArgb( p&#91;2&#93;, p&#91;1&#93;, p&#91;0&#93; );
		}

		private static double GetColorFitness( Color c1, Color c2 )
		{
			double r = c1.R - c2.R;
			double g = c1.G - c2.G;
			double b = c1.B - c2.B;

			return r * r + g * g + b * b;
		}

	}
&#91;/sourcecode&#93;

Optimized code, 25 times as fast:

&#91;sourcecode language='csharp'&#93;
	public struct Pixel
	{
		public byte B;
		public byte G;
		public byte R;
		public byte A;
	}

	public class NewFitnessCalculator : IDisposable
	{
		private Bitmap _bmp;
		private Graphics _g;

		public NewFitnessCalculator()
		{
			_bmp = new Bitmap( Tools.MaxWidth, Tools.MaxHeight );
			_g = Graphics.FromImage( _bmp );
		}

		public void Dispose()
		{
			_g.Dispose();
			_bmp.Dispose();
		}

		public double GetDrawingFitness( DnaDrawing newDrawing, Pixel&#91;&#93; sourcePixels )
		{
			double error = 0;

			Renderer.Render(newDrawing, g, 1);

			BitmapData bd = _bmp.LockBits(
				new Rectangle( 0, 0, Tools.MaxWidth, Tools.MaxHeight ),
				ImageLockMode.ReadOnly,
				PixelFormat.Format32bppArgb );

			unchecked
			{
				unsafe
				{
					fixed ( Pixel* psourcePixels = sourcePixels )
					{
						Pixel* p1 = (Pixel*)bd.Scan0.ToPointer();
						Pixel* p2 = psourcePixels;
						for ( int i = sourcePixels.Length ; i > 0 ; i--, p1++, p2++ )
						{
							int r = p1->R - p2->R;
							int g = p1->G - p2->G;
							int b = p1->B - p2->B;
							error += r * r + g * g + b * b;
						}
					}
				}
			}
			_bmp.UnlockBits( bd );

			return error;
		}

	}

First of all we notice that each time the fitness function is called, a new bitmap is constructed, used and then destroyed. This is fine for a function that seldom gets called. But for a function that is repeatedly called, we’ll be far better off if we reuse the same Bitmap and Graphics objects over and over.

Therefore I have changed the class from being static into one that muct be instantiated. Of course, that requires some minor changes to the consumer of this class, but in my opinion this will only be for the better. Although convenient, static methods (and/or singletons) are very hostile to unit testing and mocking, so I’m trying to move away from them anyway.

To my surprise, this first optimization attempt only buys us a few percent performance increase. I’m somewhat surprised at this, but anyway, it’s a start, and now it will get better. Read on.

So, once we’ve added a constructor to create the bitmap and graphics objects once and for all (as we’ll as making the class disposable so that the two GDI+ objects can be disposed) we move on to the real performance issues:

	for ( int y = 0 ; y < Tools.MaxHeight ; y++ )
	{
		for ( int x = 0 ; x < Tools.MaxWidth ; x++ )
		{
			Color c1 = GetPixel( bmd1, x, y );
			Color c2 = sourceColors&#91;x, y&#93;;

			double pixelError = GetColorFitness( c1, c2 );
			error += pixelError;
		}
	}
&#91;/sourcecode&#93;

This code looks pretty innocent, eh? It is not.

Even for a moderately sized bitmap, say 1,000 by 1,000 pixels, the code in the inner loop is executed 1,000,000 times. Thats a pretty big number. This means that each tiny little "error", performance-wise, is multiplied by 1,000,000 so every little tiny tiny thing will count in the end.

So for example, just each method call will consume time compared to having the method's code inline within the loop. Above we find two method calls GetPixel and GetColorFitness which will be far better off moved inside the loop, but as I will end up explaining is that the worst performance hog here is really the innocent looking line "Color c2 = sourceColors&#91;x, y&#93;;". Anyway, off we go:

&#91;sourcecode language='csharp'&#93;
			unchecked
			{
				unsafe
				{
					for ( int y = 0 ; y < Tools.MaxHeight ; y++ )
					{
						for ( int x = 0 ; x < Tools.MaxWidth ; x++ )
						{
							byte* p = (byte*)bmd1.Scan0 + y * bmd1.Stride + 3 * x;
							Color c1 = Color.FromArgb( p&#91;2&#93;, p&#91;1&#93;, p&#91;0&#93; );
							Color c2 = sourceColors&#91;x, y&#93;;

							int R = c1.R - c2.R;
							int G = c1.G - c2.G;
							int B = c1.B - c2.B;

							error += R * R + G * G + B * B;
						}
					}
				}
			}
&#91;/sourcecode&#93;

The above changes, including changing the variables R, G &amp; B from double into int will buy us approximately a 30% speed increase. Ain't much compared to 25 times but still we're moving on. Then we can look at the "Color c1" and notice that we can get rid of it completely by simply changing the inner code like so:

&#91;sourcecode language='csharp'&#93;
			byte* p = (byte*)bmd1.Scan0 + y * bmd1.Stride + 3 * x;
			Color c2 = sourceColors&#91;x, y&#93;;

			int R = p&#91;2&#93; - c2.R;
			int G = p&#91;1&#93; - c2.G;
			int B = p&#91;0&#93; - c2.B;

			error += R * R + G * G + B * B;
&#91;/sourcecode&#93;

Now we actually have code that executes TWICE as fast as our original code. And now we must turn our attention to the first two. The rest I don't think we can do much about.

Think about it. What we want to to is loop over each and every pixel in the image. Why then do we need to <em><strong>calculate </strong></em>the memory address for <em><strong>each pixel</strong></em> when we want to move to the <em><strong>next pixel</strong></em>? For each pixel we do completely unnecessary calculations. First "(byte*)bmd1.Scan0 + y * bmd1.Stride + 3 * x"; this contains four variables, two additions and two multiplications when really a single increment is all we need.

Then "sourceColors[x, y]". Fast enough and nothing we can improve here, right? No, no no, this is far WORSE! It looks completely harmless, but not only is a <strong>similar formula as the previous one</strong> taking place behind the scenes; for each pixel, the <em><strong>x and y parameters are being bounds checked</strong></em>, ensuring that we do not pass illegal values to the array-lookup!!!

So this innocent-looking expression will cause someting like this to happen somewhere around a million times for each fitness calculation:


			// pseudo-code
			if ( x < sourceColors.GetLowerBound( 0 ) || y < sourceColors.GetLowerBound( 1 ) || x > sourceColors.GetUpperBound( 0 ) || y > sourceColors.GetUpperBound( 1 ) )
				throw new IndexOutOfRangeException( "(Index was outside the bounds of the array." );
			Color c2 = *( &sourceColors + x * ( sourceColors.GetUpperBound( 1 ) + 1 ) + y );

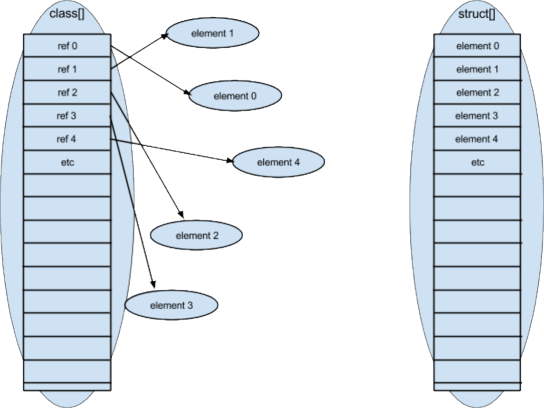
Now we’re in for a little heavier refactoring. Unfortunately the sourcePixel matrix is laid out column-by-row instead of row-by-column which would have been better, so in order to solve this issue I’ll even change it into a vector of type “Pixel” instead. This requires change to the method signature and to the construction of the the matrix/vector itself of course, but once in place:

			unchecked
			{
				unsafe
				{
					fixed ( Pixel* psourceColors = sourceColors )
					{
						Pixel* pc = psourceColors;
						for ( int y = 0 ; y < Tools.MaxHeight ; y++ )
						{
							byte* p = (byte*)bmd1.Scan0 + y * bmd1.Stride;
							for ( int x = 0 ; x < Tools.MaxWidth ; x++, p += 3, pc++ )
							{
								int R = p&#91;2&#93; - pc->R;
								int G = p[1] - pc->G;
								int B = p[0] - pc->B;

								error += R * R + G * G + B * B;
							}
						}
					}
				}
			}

we´re actually in for a performance improvement of 15 times!!!

Yeah, that’s actually how bad (performance-wise) the innocent looking line “Color c2 = sourceColors[x, y];” was. Bet some of you didn’t know that!!! 🙂

In order to change sourceColors from a matrix of Color into a vector of Pixel (declared as in the second code window above) I did this:

		public static Pixel[] SetupSourceColorMatrix( Bitmap sourceImage )
		{
			if ( sourceImage == null )
				throw new NotSupportedException( "A source image of Bitmap format must be provided" );

			BitmapData bd = sourceImage.LockBits(
			new Rectangle( 0, 0, Tools.MaxWidth, Tools.MaxHeight ),
			ImageLockMode.ReadOnly,
			PixelFormat.Format32bppArgb );
			Pixel[] sourcePixels = new Pixel[Tools.MaxWidth * Tools.MaxHeight];
			unsafe
			{
				fixed ( Pixel* psourcePixels = sourcePixels )
				{
					Pixel* pSrc = (Pixel*)bd.Scan0.ToPointer();
					Pixel* pDst = psourcePixels;
					for ( int i = sourcePixels.Length ; i > 0 ; i-- )
						*( pDst++ ) = *( pSrc++ );
				}
			}
			sourceImage.UnlockBits( bd );

			return sourcePixels;
		}

Probably a little overkill… but what the heck… Now I guess many people who are familiar with LockBits and direct pixel manipulation will cry out HEY YOU CAN’T DO THAT! YOU MUST TAKE THE “STRIDE” INTO ACCOUNT WHEN YOU MOVE TO A NEW SCAN LINE.

Well, yes… and no. Not when I use the PixelFormat.Format32bppArgb! Go figure! 🙂

So our new changes means that we process each ROW in the bitmap blindingly fast, as compared to the original version and combined with our caching of the bitmap we have gained a performance boost of 20 times!

Now for my final version I have rendered the drawing in PixelFormat.Format32bppArgb, which is the default format for bitmaps in GDI+. In that format each pixel will be exactly four bytes in size, which in turn means that GDI+ places no “gap” between the last pixel in one row and the first pixel in the next row and so we are actually able to treat the whole image as a single vector, processing it all in one go.

To conclude: in c# we can use unsafe code and pointer arithmetic to access an array far faster than the normal indexer, because we short-circuit the bounds checking. If we iterate over several consecutive elements in the array our gain is even larger, because we just increment the pointer instead of recalculating the memory address of the cells of the array over and over.

Normally we don’t want to bother with this because the gain of safe and managed code is bigger than the performance gain. But when it comes to image processing this perspective may not be as clear.

BTW, I wrote a post on a similar topic a few months ago: Soft Edged Images in GDI+.

EDIT: Continued here Ekeforshus

Posted in .NET, GDI+, Programming | 15 Comments »